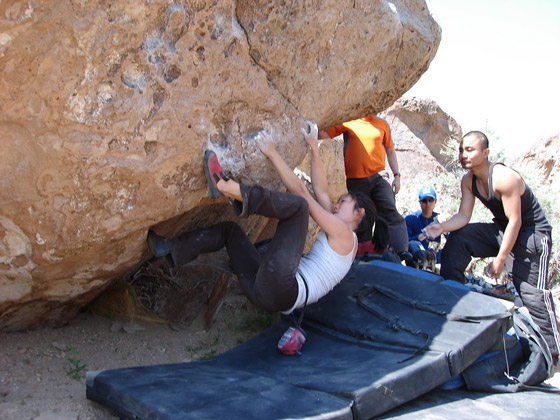
Bouldering is a type of rock climbing where climbers ascent small, free-standing rocks known as boulders. These boulders don’t reach much higher than 17 feet and therefore no harness or rope is needed. The only form of protection used in bouldering is a small mattress known as a crashpad. Additionally, a friend takes up the role of ‘spotter’ and helps ensure the climbers safely lands on the crashpad.
Aside from outdoor climbing, bouldering is also practised indoors on artificial holds. In recent years, with the ever-growing popularity of climbing as a sport, indoor gym bouldering has risen in popularity. Much of this growth has been due to the Olympic debut of the sport and academy-award-winning films such as Free Solo introducing climbing into the mainstream.
While roped climbing requires a partner, bouldering does not, making it the ideal solo sport!
Additionally, bouldering is a full-body workout and offers a fun way to train the body. Progression can be tracked by advancing in the gym’s grading system.
☕️ Make yourself a cup of coffee & let’s learn more about bouldering.
Two types of Bouldering
Outdoor Bouldering
Outdoor bouldering has been around since the ’50s (some might argue earlier). This was originally considered a training exercise for Alpine climbing but became a fully fletched sport by the late 20th Century.
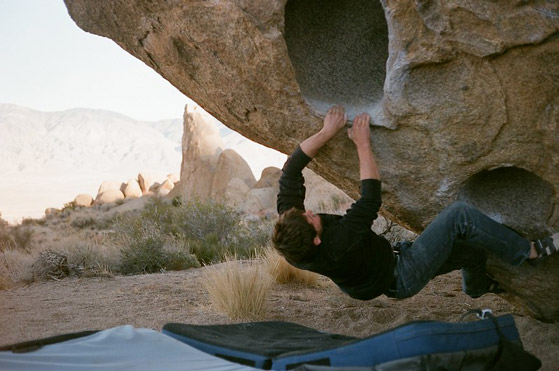
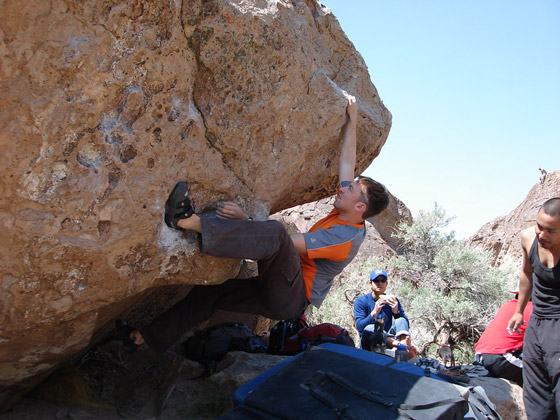
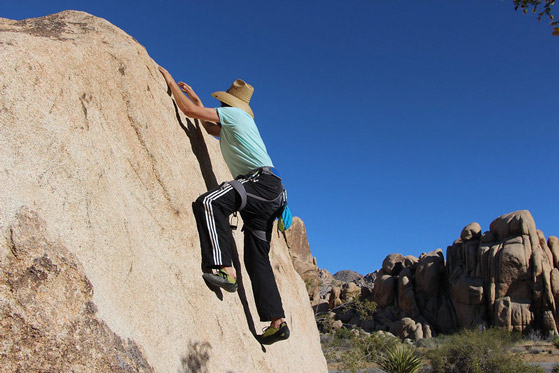
As aforementioned, outdoor boulderers climb small rock faces known as boulders. The individual routes are called ‘boulder problems’. As protection, they use crash pads to place underneath the boulders and function as a landing zone.
To find boulder problems, boulderers show up to bouldering areas (crags) with a guidebook in hand (topo) that conveys information about the different types of boulder problems in the area and how to ascend them.
Indoor Bouldering
While indoor boulder gyms were originally created as training for outdoor climbing, indoor bouldering has become a sport of its own. Many boulderers rarely (if ever) venture outdoors. This can be based on personal preference or simply due to the lack of local crags. Either way, bouldering is increasing in popularity and more and more bouldering gyms are popping out of the woodwork.

These indoor bouldering gyms look similar to climbing gyms, with the exception that the walls are no higher than 15 feet (4.5 meters) and the mats are thicker to protect climbers in case of a fall. Oftentimes, bigger climbing gyms might have a boulder section.
How does bouldering differ from climbing?
Conventional climbing activities require a rope and harness to safely climb a rock. What makes bouldering different is that you don’t need a rope or a harness. Due to most boulder problems being less than 17 feet tall, all you need for bouldering is a crashpad to break your fall.
Additionally, one could make the case that bouldering requires more thinking power. While climbing routes tend to be easy to read, boulder problems, as they are called, often require a specific solution (beta) to send the problem.
📚 A bit of Bouldering History…
I’ll try not to bore you with going too in-depth into bouldering history, but here are some things you should know. (Feel free to skip)
👉 [CLICK to skip the history lesson] 👈
Bouldering finds much of its origin in the French forest of Fontainebleau. Climbers were scrambling about on Fontainebleau boulders all the way back in 1874. While it can be argued that these scrambles aren’t pure acts of bouldering, as oftentimes ropes were used, they do mark the start of Parisian climbers making their way to the infamous Fontainebleau forest and honing their climbing skills on boulders in preparation for the Alps.
Now if we’re contemplating ‘pure bouldering’, without ropes, we have to credit the British Mountain Guides for their invention and documentation of ‘boulder climbing’. Though for a long time, they didn’t consider bouldering to be a sport, more of a rainy day activity, or a training method for alpine climbing.
It wasn’t until the last quarter of the 20th century that talented British climbers began to perceive their invention, bouldering, as a legitimate activity, equal in status to serious lead climbing.
John Gill, Origins of bouldering
Until the French Alpinist and prominent boulderer Pierre Allain came along, much of bouldering was done in ‘nailed boots’, the nails allowing climbers to stand atop microscopic footholds. In the 1930s, Pierre Allain invented the first soft-soled climbing shoe. Its later iterations look very similar to the climbing shoes we use today.
If one person deserves the most credit in the progression of bouldering as a sport, it has to be John Gill. Many consider Gill to be the father of modern bouldering for his efforts to turn bouldering into a sport. Gill also brought multiple inventions into the sport of bouldering.
For starters, John Gill introduced chalk into climbing. Before him, climbers would wipe their sweat off and use dirt to dry their hands. Additionally, coming from a gymnastic background, Gill introduced dynos into the sport. A dyno is a dynamic move where both feet and hands release from the holds as you use momentum to jump towards another hold.
Both dynos and chalk play a huge role in bouldering (and climbing) today.
If you want to learn more about bouldering history, you can read excerpts from John Gill’s book ‘Origins of Bouldering’ on his website OR better even, you can purchase his book.
🎒 What do you need to go bouldering?
One of the allures of bouldering, compared to conventional climbing, is that you don’t need nearly as much gear! Bouldering is the cheapest form of rock climbing. Here’s the little bit of gear that you do need.
Gear for outdoor bouldering
| Image | Gear | Description | Cost |
|---|---|---|---|
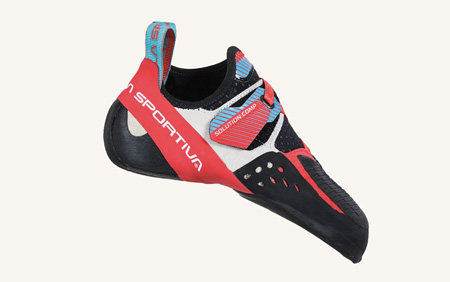 | Climbing shoes | Climbing shoes are used to support a climber’s feet on small footholds. | $100 – $200 |
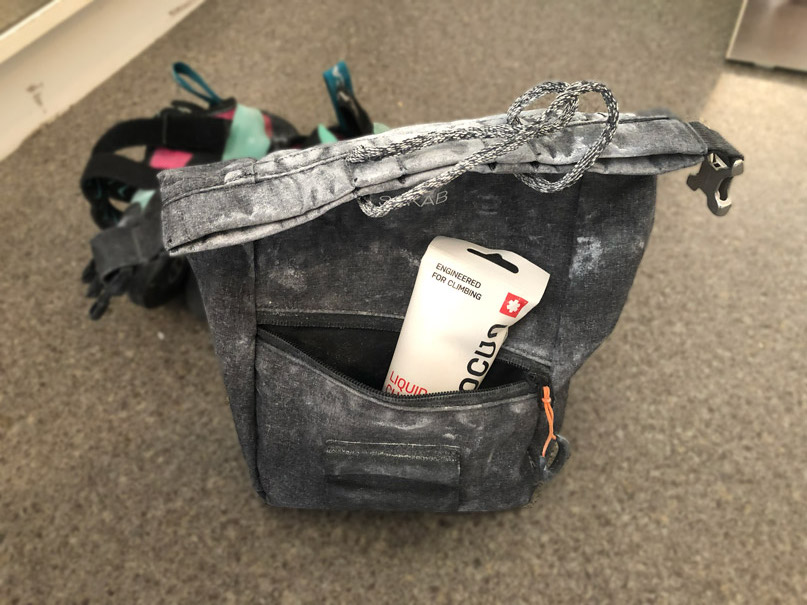 | Chalk bag / boulder bucket | A chalk bag holds your chalk. Chalk bags can be wrapped around your waist with a belt. Many boulderers opt for a bouldering bucket as it can stand on its own, is capable of holding more chalk, and has space for brushes and personal belongings such as car keys and phone. | $15 – $30 |
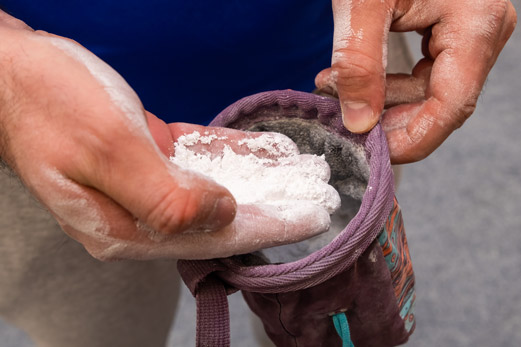 | Chalk | Chalk is used to give your hands more grip while climbing. Every boulderer uses chalk, even if they don’t have sweaty hands. Chalk comes in both liquid and powdered format. | approx. $5 for 200 grams |
 | Crashpad | Crashpads are foldable mats that can be carried on your back for easy portability to and from the crag. These are used to create a landing zone when bouldering outdoors. | $150+ rent: $10/day |
 | Guidebook | Guidebooks are used to locate and identify boulder problems at the crag. These can be pricey so some boulderers prefer to use the Mountainproject app which is free but sometimes lacks information. | free/$30+ |
 | Climbing Brush | A brush can be used to remove excess chalk from a hold. | $10 |
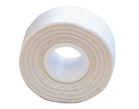 | Climbing Tape | Tape is used to patch up the fingers in case of a skin tear. | $4/roll |
Read also: how much does bouldering cost?
Gear for indoor bouldering
Indoor bouldering requires much less gear than outdoor bouldering. You don’t need a guidebook or crashpad and even the climbing brush can be left out as these are readily available at the gym.
If you are serious about bouldering you should bring climbing shoes and chalk and maybe some climbing tape to patch up your fingers once you tear skin.
As a beginner though, you can come to the bouldering gym empty-handed. Every bouldering gym will have rental shoes for you to wear and chalk for you to either rent or buy. Rental shoes are only about $3 – $5 per session so it’s really not worth it to bring your own if you’re just starting out.
Climbing shoes
While a lot of gear can be left behind, climbing shoes are essential for bouldering. Luckily, you don’t need to buy a pair of climbing shoes, you can rent them instead.
If you are further along and plan to get your own pair of climbing shoes for bouldering, here are some links to help you get started:
- Should climbing shoes hurt?
- Anatomy of a climbing shoe
- The difference between men’s and women’s climbing shoes
- Soft vs Stiff climbing shoes
🧗♀️ Outdoor Bouldering vs Indoor Bouldering
How do outdoor and indoor bouldering compare? Let’s take a look…
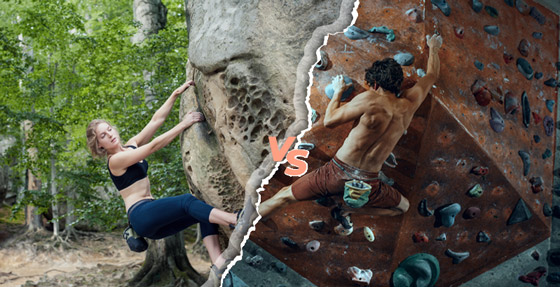
For starters, indoor boulders have easy-to-read colored holds while outdoors it is much harder to discern the holds. Outdoor boulder problems are also much tougher on the skin than their indoor counterparts, especially sharp granite boulders.
Outdoor bouldering is unquestionably more dangerous than indoor bouldering. Inside a gym, the climber is protected by thick mats, and boulder problems are never higher than 17 feet. Outdoors, climbers bring their own crashpads which are much thinner and smaller than the large mats found in gyms. Additionally, some highball boulder problems go up to 30 feet high.
Indoor bouldering can be practiced safely alone. During outdoor pursuits, a spotter is necessary to help the climber in case of a fall.
Top-outs differ as well. Boulder gyms require the climber to top out by matching the final hold. Outdoors, topping out requires one to reach over the edge and push themselves up and over as if to get out of a swimming pool.
While (most) indoor bouldering gyms use the same grading as the outdoors, indoor grades do not straightforwardly translate to outdoor grades. This is a result of indoor grades being largely inflated to give the climber a sense of progression. Boulderers who climb outdoors tend to climb at least 2 grades below their indoor difficulty.
And finally, outdoor bouldering is weather-dependent whereas indoor bouldering is not.
Boulder Grading
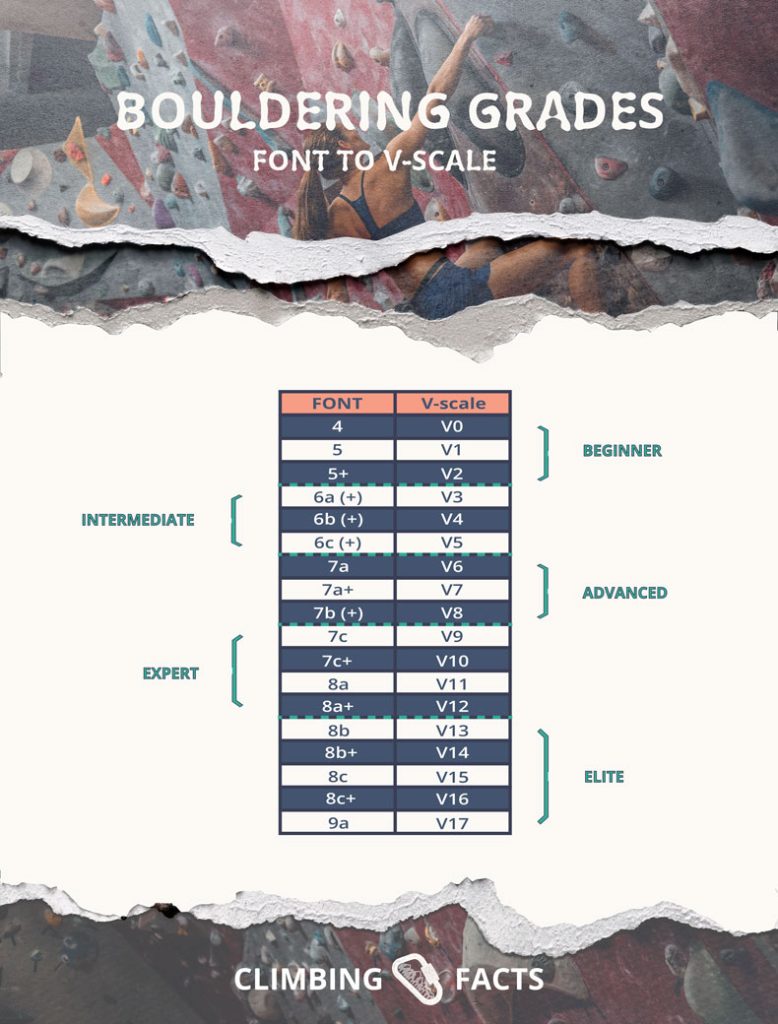
Outdoor boulders, and those found indoors, are graded based on difficulty. While many grading scales have come and gone, as of right now two grading systems are most widespread: the Font scale and the V-scale. The Font scale is dominant in Europe and Asia while the V-scale is commonplace in North America.
The Font scale uses numbers (3 – 9) and letters (a,b,c) as well as +’s to differentiate between grade difficulty. For example, an easier Font grade is 5+ and a much harder one is 8A.
The V-scale is much simpler than that and starts from V0 and counts up to V17.
Here is a conversion chart for Font to V-scale.
Continue reading: Bouldering Grades around the world & how to convert them
How to start Bouldering
How to prepare your first visit to a bouldering gym
What to bring…
As aforementioned, you don’t need to bring anything to a bouldering gym on your first visit. Bouldering gyms have rental shoes for you as well as the availability to rent a chalk bag or purchase liquid chalk.
What to wear…
So no gear is required, great! So what should you wear...? Anything you wear to a conventional gym will suffice. Gym shorts, joggers, leggings, and biker shorts, are all ideal for bouldering. Try to avoid jeans or tight chinos as those might limit your movement. For your top, you’ll want to go with something breathable such as a tech t-shirt, tank top, or a sports bra. Some gyms allow shirtless climbing but make sure it’s allowed before taking your top off.
Your first boulder problem
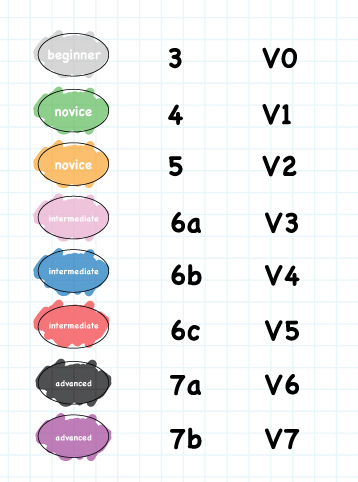
It’s time to start climbing! Before you select your first boulder problem, you’ll want to familiarize yourself with the grading system of the gym. Do they use their own grading scale? Or have they adopted the Font, V-scale, or another outdoor grading scale?
Once you have figured this out, find a boulder problem with the easiest grade to start out. If your gym uses Font grading, look for a 3 or a 4. If V-scale is applied, look for a V0 or VB grade.
Next, you’ll want to find the start and finish position.
The start position should be marked in some way or another. Sometimes it literally says ‘start’ other times the grade sticker will mark the start. If the start hold isn’t obvious, ask the front desk what to look for.
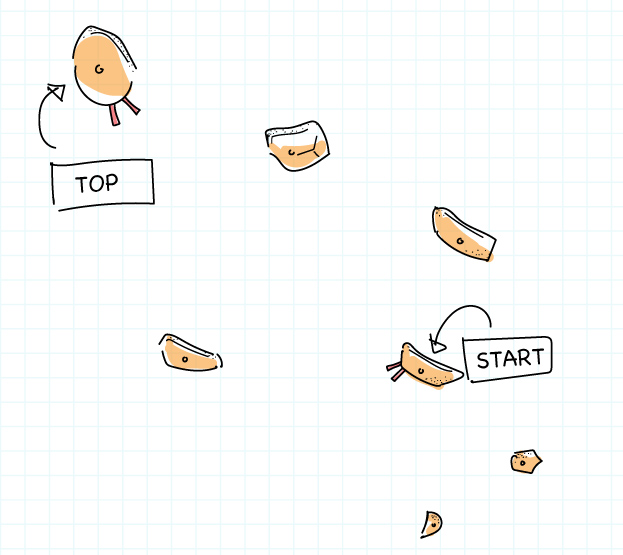
The start hold will either require a match position (both hands touching the start hold) or two individual starting handholds. This too should be obvious. Some gyms mark this by adding pieces of tape. 2 pieces of tape on a large hold means the hold is a match hold.
Most bouldering gyms don’t mark the footholds so you can just use the first footholds on the problem.
To correctly start your boulder problem, your hands and feet should be removed from the mat.
On the route, you can only use the hand and footholds that match the color of the boulder problem. Additionally, you can touch the wall, push off the wall (smearing) and use the volumes on the wall.
To finish the boulder problem, you have to match the final hold in a controlled position.
If you wish to learn more about indoor bouldering, such as how to start and finish a boulder problem, what kind of holds to expect, and more please read our guide on the Basics of Indoor Bouldering.
How to descend in bouldering
After finishing your boulder problem, you have to come down as well. Some climbing gyms will have you top out by climbing over the edge in which case you can descend from a ladder or staircase. This is quite rare though.
Most of the time you will have to climb down.
When downclimbing, you are allowed to use any hold on the wall that you want. Oftentimes, easier routes are nearby and make for an easy downclimb. Once you get to a comfortable height you can just down.
How to safely fall in bouldering
Part of bouldering is falling down. Sometimes you’ll bail a climb because it gets hard, and other times the wall will force you off. In any case, it is important to know how to fall, before you start bouldering.
To safely fall, you want to fall on your feet with knees bent (squat position) and engage the Tuck and Roll technique.
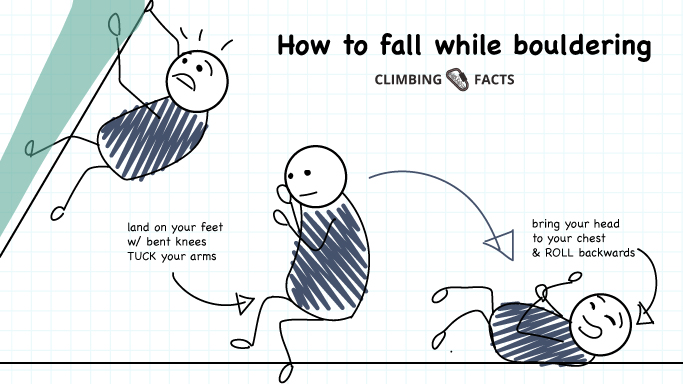
The Tuck & Roll technique implies that you TUCK your arms as you jump down and ROLL backward to break the fall.
Tucking your arms prevents you from landing on and potentially breaking your arms and rolling over takes pressure away from the knees.
Bouldering etiquette
- Share the boulder problems. Just because you’re projecting something, doesn’t mean you have to hog the wall. Share the problems and always check if no one is waiting behind you before getting back on the wall.
- Don’t collide with other climbers. Whoever is on the wall has the right to finish their problem without you endangering them. Before you start a boulder problem, always ensure no one is doing the same route or another route that might collide with yours.
- Always look up and don’t stand underneath routes. Nothing is scarier than being high up on a boulder and seeing someone waltzing underneath you. Don’t put other people through that and always look up when navigating a bouldering hall.
- Don’t give unsolicited advice (known as beta spraying). Boulderers enjoy the problem-solving part of their sport, therefore you should never give someone advice about a problem they are working on without being asked to or without asking for permission first. You might think you are doing good by helping but this act is seen as ‘spraying beta’ and not a good thing!
- Be mindful with your chalk use. Powdered chalk is great at giving you extra grip but the dust particles it exposes in the air aren’t good for you and those around you. Always ensure your chalk dust isn’t going to get into else’s direction.
- Don’t wear rentals or climbing shoes to the bathroom. Bathroom floors are nasty and will get germs all over the soles of your climbing shoes which wind up standing on handholds.
- Don’t disrupt the peace. Both at indoor walls and the local crag, you should keep to yourself to maintain the peace. There is no reason to intimidate other climbers with your growls or to play music at the crag. Music scares wildlife and can intimidate hikers and passersby, don’t be that group.
- Pick up after yourself. Always leave the crag clean and don’t leave anything behind.
- Don’t walk off-trail. You can ruin vegetation by walking off the trail. Stay on trail and walk single file.
Types of boulders
Here are the three most common boulders you’ll find indoors & outdoors:
- Vertical
- Slabs
- Overhangs
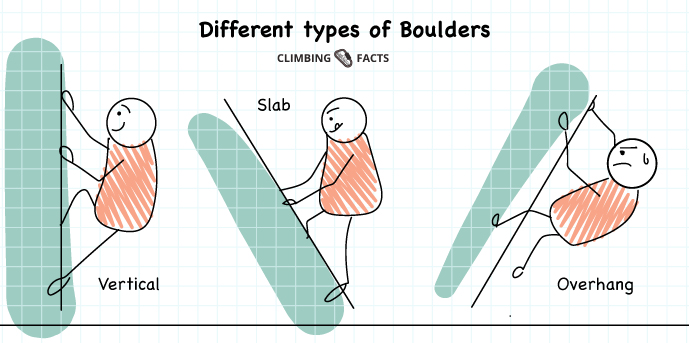
Vertical – Vertical problems stand up straight 90 degrees to the floor, making them straight-forward and the most comfortable type of boulder for beginners.
Slabs – Slab problems are less than 90 degrees from the ground. When looking at a slab, you’ll notice that the wall leans away from you. Slabs are much more difficult for beginners as they require excellent footwork.
Overhangs – Overhangs are walls that lean forward. They can range from a slight overhang to an actual roof. This the most intimidating type of terrain to newer climbers. It requires core tension and proper climbing technique (straight arm hang) to pull off.
Bouldering terms
As you may have noticed throughout this guide, climbers tend to have their own lingo. To help yourself fit in at the local crag or bouldering gym, you might benefit from learning some of these terms!
- Send – Successfully ascending a boulder problem is referred to as a ‘send’.
- Project – A boulder problem that you see as your current goal for the day or week.
- Beta – Refers to the solution to a boulder problem. You can help someone send a climb by giving them beta. Some problems have multiple betas for example a beta for short people and a beta for tall people. Example usage: ‘do you want the beta?’
- Dyno – A dynamic movement in bouldering where all holds are released.
- An onsight – An onsight is when you successfully finish a boulder problem first try without any prior knowledge or beta.
- Smearing – Smearing refers to placing your foot on the bouldering wall instead of a foothold. This can be used as a last resort when there is no proper foothold to push from.
- A flash – A flash is when you successfully finish a boulder problem on your first try with the help of beta from another climber.
- Cut feet – This is when your feet cut away from the wall. Cutting feet often happens during an overhang when the climber loses control over their feet.
- Sandbag – A sandbag is a term used to refer to a climb that is graded too soft. For example, a V2 boulder problem that feels more like a V3 is a sandbagged boulder problem.
- Barndoor – Imagine your body swinging away from the wall, this is called a barndoor.
How to go Bouldering Outdoors (for the first time)
Here’s everything you need to know for a future outdoor bouldering trip.
Locate a bouldering crag + preparation
First, you’ll need to find a bouldering crag that has plenty of beginner problems available. If you happen to live in California or near Paris, you can go to the world famous bouldering locations Bishop (California) & Fontainebleau (France).
If you’re not as fortunate, you can start your search on Mountainproject.
🔎 Head over to Mountainproject.com or download the app.
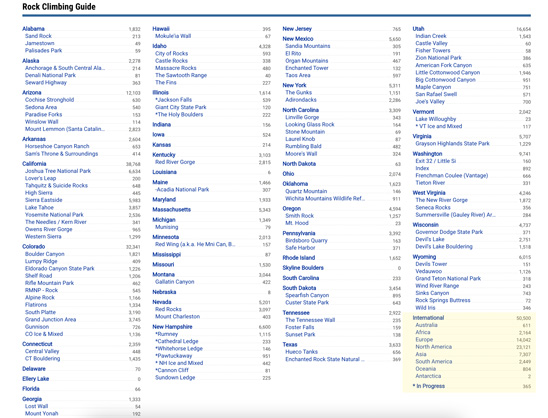
Scroll down and you’ll find the ‘Rock Climbing Guide’ where you can select your state/country.
Alternatively, you can use the Mountainproject map and search for boulders, highlighted in green.
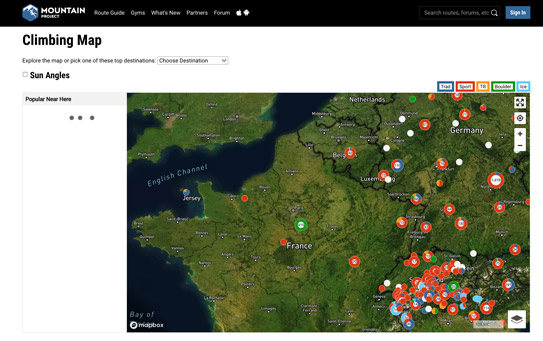
Using these sources, you should be able to locate boulder problems, and subsequently, find bouldering crags in your area.
Please note that Mountainproject is crowdsourced. Most of the routes on here are from the US. If you are not from the US, you might want to purchase a guidebook for your area.
We also have a📍 list of popular bouldering locations further in this guide.
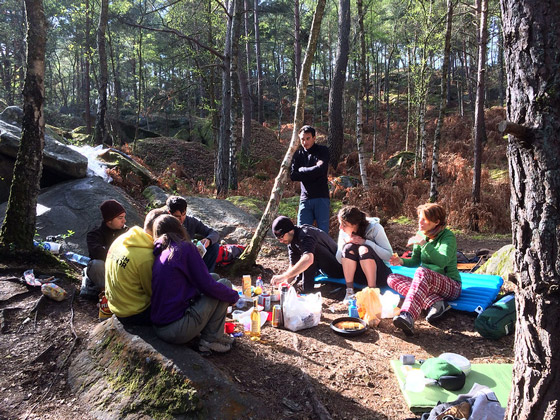
Partner up
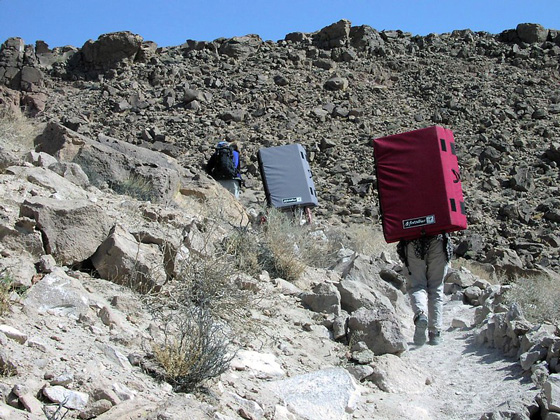
Outdoor bouldering is NOT a solo activity. You should bring at least one friend and ideally two. Your partner(s) should also carry an extra crashpad.
So either invite a friend, or find someone at the indoor gym who wants to venture outdoors.
Best case scenario, you bring someone experienced with outdoor bouldering.
What to bring in your backpack
Here’s what you’ll need to bring to an outdoor bouldering session.
| Gear for Outdoor Bouldering |
|---|
| Climbing shoes |
| Chalk bag with chalk |
| Crash pad(s) |
| Guidebook and/or mountainproject app |
| Climbing Brush |
| Climbing Tape |
| Water & snack |
| Sunblock |
| (trash)bag for your litter |
Weather conditions
Part of preparing for outdoor bouldering is checking the weather report a few days in advance. You don’t want rainfall as holds become slippery and usable but you don’t want sunshine either.
Climbing in the blazing sun gives you unnecessary sunburn, tires you out quickly, makes your hands sweat a lot, and heats up the rock making it impossible or painful to touch.
Boulderers don’t refer to a ‘good day’ in the same way as your average joe does. A good climbing day is a cool day with little or no sun and absolutely no rain. Sometimes boulderers will wait until nightfall during the summer for sun-avoiding reasons.
Ideal sending temperature is between 40 and 60 degrees Fahrenheit or between 5 and 15 degrees Celsius.
The approach
Every bouldering crag is different. Sometimes you can find boulders within minutes of the parking lot while other times you have to hike for half an hour just to get to your first boulder. For this reason, always make sure you do your research beforehand so you don’t run into any surprises.
Wear hiking shoes on your approach. From now on, you refer to them as approach shoes. Sometimes, bouldering crags are outside of cell phone range. To be safe you should always have an offline map of the bouldering area stored on your phone. You can easily download this using Google Maps.
How to identify the boulder problem
To find bouldering problems, you will need to have either a guidebook ($$) to your local crag or use the mountainproject app (free). Though I thorougly recommend a guidebook over an app for your first outdoor bouldering experience.
Guidebooks come with a lot of information about individual boulder problems including GPS coordinates, illustrations of the problems, and valuable info such as how many pads you require. Being crowdsourced, the mountainproject app can be helpful, but isn’t nearly as well-rounded.
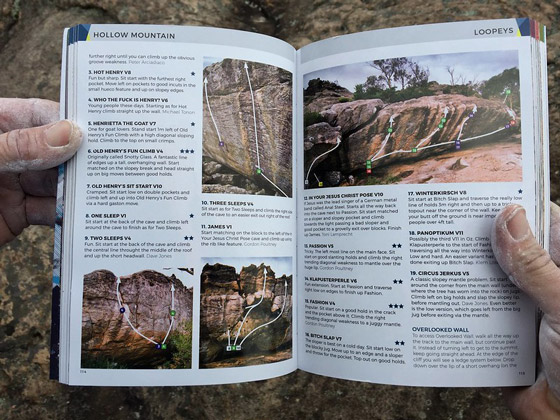
Once arrived at your target boulder, you can check the guidebook to find out the start position as well as the line. Oftentimes, a boulder will have multiple problems on them so double-check before you hop on. Images in guidebooks usually illustrate the boulder problem so you really can’t make any mistakes.
If there is no information about the start hold, you can use any hold that is within the corresponding line of the boulder problem.
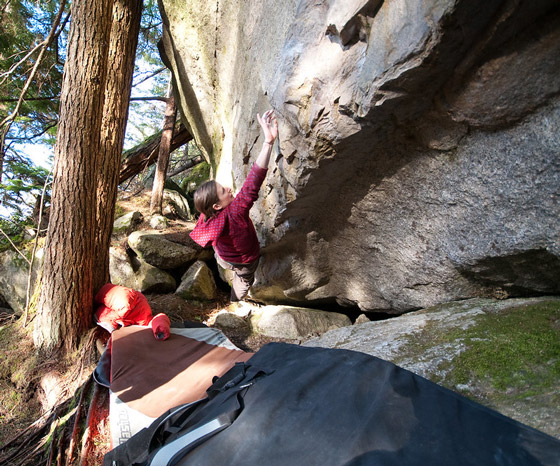
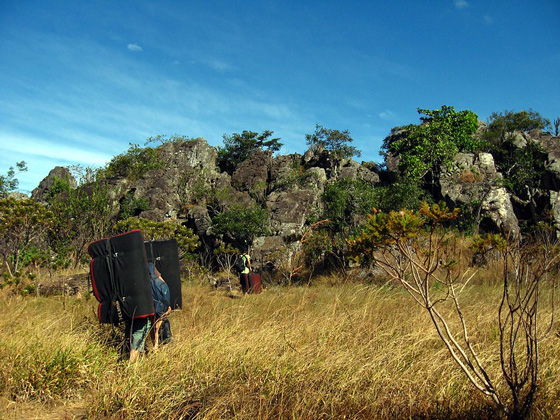
How to set up a crashpad
Crashpads are used to break the fall. For this reason, you have to make sure the crashpad is always directly underneath line of fall for the climber. This means the spotter might have to move the crashpad if the boulder problem isn’t going in a direct line upwards.
As the climber, you have to be extra wary of your landing spot during outdoor bouldering. If you feel you are about to fall down, you should select a landing spot.
For high ball boulders that go beyond 15 feet, multiple crashpads should be stacked to create extra cushioning.
If you only have access to one or two crashpads, you might not be able to tackle every bouldering problem in the crag. Accept this and don’t attempt any boulders that clearly require more bouldering pads than you brought.
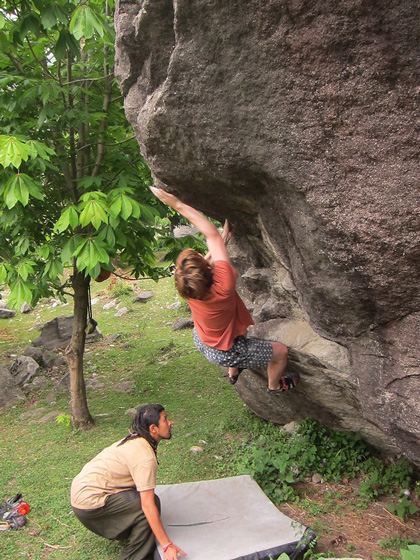
How to spot
Spotting is essential in outdoor bouldering and everyone in your party should know how to spot correctly. The idea with spotting is that the spotter wants to guide the climber to the crashpad in case of a fall, the spotter is not meant to catch the climber.
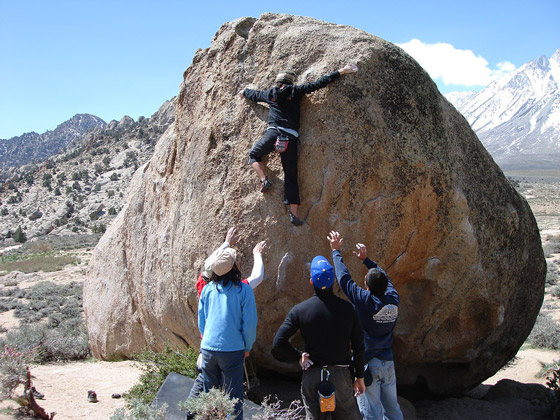
The spotter should be standing within range of the climber but not so that they will obstruct the landing zone. Oftentimes this means the spotter will stand on the edge of the crashpad or just outside of it. Spotters should stick both hands out to guide the climber. When spotting, make sure your fingers are touching and not spread out to prevent injury.
You should aim to spot just above the waist. In the best case, you want the climber to land in a standing position. The spotter should prevent the climber from falling over during their landing or falling head first.
Spotting is not just about guiding the climber in case of a fall, you should also be mindful of the landing zone and move the crashpad if needed.
Bouldering Grades
Outdoor boulders are graded just like indoor boulders are. However, outdoor grades almost never match their indoor counterparts. This is because grading in gyms is inflated to give you a better sense of progression. You have to lower your standards when climbing outdoors. Most people climb 2 grades below their indoor bouldering grade. So if you climb V5 indoors, you will likely climb V3 outdoors.
Outdoor Bouldering Ethics
You may or may not have heard of the term ‘Leave no Trace’. This is the ethos that climbers use at crags. Leave no trace doesn’t just mean you don’t leave litter behind. Picking up after yourself isn’t a climbing ethos, it’s common decency. Leave no trace means more than that:
- Don’t leave ANYTHING behind
- Brush the holds once you’re done
- Don’t trample vegitation
- Clean up chalk spills
- Don’t disturb the peace
📍 Where to go bouldering?
Top Bouldering Locations in the US
Bishop, California, USA
Bishop is probably the best bouldering location in the United States and can easily rank itself amid the top of destinations in the world. Amongst American climbers, bishop is the place to be. Though Bishop isn’t actually a bouldering destination in itself. It’s the name of a city in California that is very well known for its nearby crags. When climbers say the went bouldering in Bishop, what they really meant is they went to one of the nearby bouldering spots: Happy Boulders, Sad Boulders, and Buttermilk Country.
Bishop has more than 2,000 boulder problems to choose from. Ranging from beginner difficulty (V0) to expert difficulty (V16). Boulders come in two rock types: volcanic tuff, which is found in both Happy and Sad Boulders and granite, found in Buttermilk Country.
Hueco Tanks, Texas, USA
Hueco Tanks is a popular bouldering crag in Texas. This is also the place where bouldering pioneer John ‘Vermin’ Sherman spend most of his time, establishing hundreds of bouldering problems and designing the now widespread V bouldering scale.
With over 1,600 boulder problems listed on TheCrag, Hueco Tanks is one of the most densily populated bouldering locations in the US.
TIP: If you plan a trip to Hueco, you can camp at the Hueco Rock Ranch, which is just a mile from Hueco Tanks.
Joshua Tree
Joshua Tree National Park is one of California’s top locations for bouldering. The park has over 1,300 boulder problems so you won’t run out any time soon.
If you plan to visit Jtree, be prepared to be humbled by it’s sandbagged bouldering grades.
TIP: you can camp in Joshua Tree at the Hidden Valley Campground though they only have 44 spots and it’s first come, first serve.
Top Bouldering locations in the world
Here are some of the top bouldering spots in the world.
Fontainebleau, France
The forest of Fontainebleau is the bouldering hotspot of the world. Not only was bouldering invented here, Fontainebleau has the largest density of boulders of any bouldering spot in the world. With over 35,000 boulder problems, it is impossible to ever run out of problems to solve.
You’ll find boulder problems for every level of difficulty. Grades range from complete beginner to expert climber. Do leave your ego at home though as the sandbagged problems at Fontainebleau are known to humble any climber.
Petrohad, Czech Republic
Petrohad, a bouldering spot in Czech Republic, is one of Europe’s largest bouldering areas. Just about 80 kilometers removed from the capital, Petrohad has more than 1500 boulder problems listed on the TheCrag. According to Planet Mountain, they have over 3000 boulder problems.
Many climbers compare Petrohad with Font as both bouldering hotspots are located in a forest. Petrohad is like a smaller Fontainebleau that is less busy, the boulders are made of granite instead of sandstone, and the beer is much cheaper.
In Petrohad, you’ll find boulder problems graded for beginners (2) all the way to expert (8b+).
Squamish, British Columbia, Canada
Squamish is the best bouldering spot in Canada. It’s granite boulders offer a playground for climbers who prefer technical boulder problems over powerful ones. TheCrag lists over 800 boulder problems in Squamish ranging from beginner difficulty (V0) to expert territory (V15).
Rocklands, South Africa
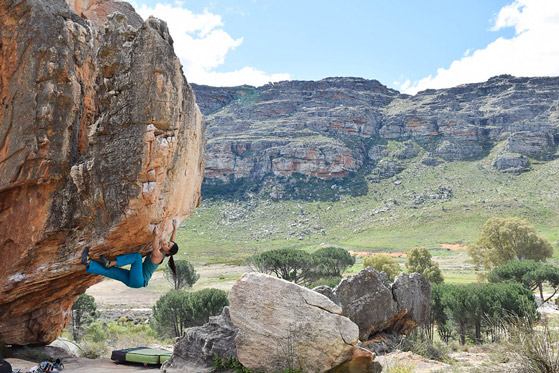
Located 200km from Cape Town, Rocklands is the place to be for bouldering on the African continent. Rocklands features over 3000 boulder problems listed on TheCrag. The sandstone boulders in Rocklands range from beginner difficulty (4) to expert difficulty (8b+).
To climb in Rocklands you need a permit which you can purchase online for less than 5 bucks.
The Grampians, Victoria, Australia

Boulderers who find themselves on the Oceanic continent will want to visit the Grampians National Park, a mountain park located in Victoria about 250kms from Melbourne. The Grampians has over 800 boulder problems listed on TheCrag that range from difficulty V0 to V15.
The Grampians National Park is huge and its many sandstone boulders are spread out across this vast area.
Sadly, bouldering in the Grampians is not what it used to be as bouldering has been banned from many areas within the park.
Hampi, India
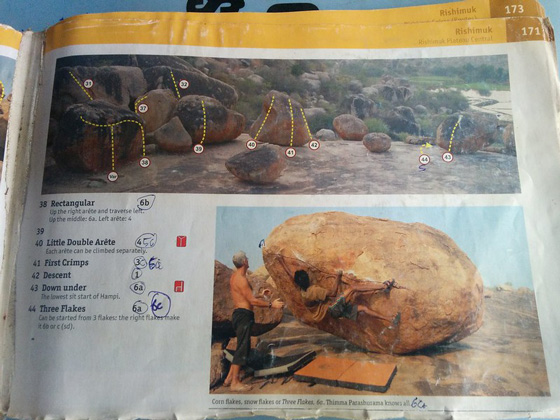
Hampi is a popular bouldering hotspot in India where you can climb countless of ancient boulders in between ancient ruins. Bouldering in Hampi was popularized after Chris Sharma’s movie ‘Pilgrimage’ which featured its marvelous boulders. Since then, climbers from all over the world have been flocking to Hampi to climb its boulders.
Hampi’s boulders are composed of sharp granite (bring tape!!) and the guidebooks use Font grading so be sure to check out our bouldering conversion table. Hampi has boulders are graded 5 all the way up to 8A. As of right now, there is only one 8a boulder in Hampi which was discovered and first ascended by Chris Sharma.
Sadly, Climbing in Hampi is very different these days from just a couple of years ago. Many of the small businesses that were offering accommodation to climbers have been demolished after a supreme court decision. It’s still possible to go bouldering in Hampi, but you might find a lot of online resources to be outdated.
Cocalzinho de Goiás, Brazil
Cocalzinho is the climbing destination in South America. Located between Brasilia and Pirenópolis, Cocalzinho de Goiás is a must-visit if you are a rock climber visiting Brazil. Boulders are graded from 5A to 8A.
There is very little to find about Cocalzinho on the English side of the web. Your best bet is to get a guidebook for the area as the boulders are not even listed on TheCrag.
Bouldering Competitions
Bouldering is no longer an activity few people participate in to practice for the alps. It is a sport that has seen a lot of growth in recent years. Bouldering was first introduced to competitions in 1998 and has since been part of most climbing competitions. In 2021, bouldering made it’s debut at the 2020 Tokyo Summer Olympics alongside lead climbing and speed climbing.
Bouldering competitions are held on artificial rock and the setting style (known as ‘comp setting’) looks different from the setting at bouldering gyms. Comp style holds are much larger than your average gym hold and the boulder problems have cryptic beta and often require a more dynamic approach.
Just like other sport competitions, the idea of bouldering comps is to please the crowd. This is why the boulder problems are always visually pleasing and at the same time hard to figure out. Such a style allows for many different betas which makes for an entertaining viewing experience.
International Bouldering Competitions
Most international bouldering competitions are hosted by the IFSC (International Federation of Sport Climbing).
They host the following international competitions:
- IFSC Climbing World Cup
- IFSC Climbing World Championship
- IFSC European Championship
- IFSC Climbing World Youth Championship
- IFSC Climbing European Youth Championship
Aside from bouldering, these climbing competitions also feature lead and speed climbing.
IFSC Format
IFSC competitions have 4 different boulder problems set on a 4 metre high wall. Competitions have 3 phases: qualification, semi-final, and finals. During each phase, the boulder problems are reset.
The boulder problems have a start position, a zone and a top position. The starting positions are marked with black tape. To top a boulder, the climber must match the final hold in a controlled position.
Whoever tops the most boulders within the least amount of attempts, wins the competition.
Throughout the qualification and semi-finals, the climbers don’t get to inspect the boulders beforehand.
During the final, the climbers get 2 minutes to inspect each boulder problem before going into isolation.
Due to the problem-solving nature of bouldering, climbers don’t get to watch each other compete and stay in isolation in-between attempts.
Ranking is based on the following order:
- Amount of tops reached
- Amount of zones reached
- Amount of attempts to top
- Amount of attempts to zone
source: IFSC
Where to watch bouldering competitions
Bouldering competitions such as the IFSC World Cups and World Championships are livestreamed on the IFSC YouTube Channel.
Viewers who live in Europe or Latin America are countryblocked and will need a VPN if they wish to watch the livestream on YouTube.
Alternatively, Europeans can watch live IFSC bouldering competitions on Eurosport or DiscoveryPlus and Latin Americans can watch the bouldering competitions on ESPN.
Highlights are uploaded to the IFSC YouTube channel. The All Climbing channel on YouTube uploads full competitions.