Flappers are a part of climbing. They are painful, but once you know how to treat them, they really aren’t that bad. Furthermore, they are pretty easily avoided if you know how they occur in the first place.
This Skin Care Guide will teach you everything you need to know about climbing flappers, how to treat them, and how to prevent them in the future.
What is a climbing flapper?
A climbing flapper occurs when the skin on your hand tears due to repeated friction against a surface, such as sharp outdoor holds, and even indoor climbing holds. While they are more common outdoors, they can happen in indoor climbing as well.
When you feel a tear in your skin after coming loose from a hold, you know you have a flapper. The name comes from the fact that some skin is still hanging on in most cases. Flappers can be painful and tend to appear on the palm side of the hand and the pads of the fingers.
Flappers are a common occurrence in climbing and are almost unavoidable. Beginners tend to get them more often since they haven’t yet developed calluses in the common areas, while experienced climbers may have their calluses ripped open resulting in a flapper once the callus becomes too thick.
However, you can treat flappers to speed up the healing process and prevent them by taking proper care of your skin, which we’ll cover in this article.
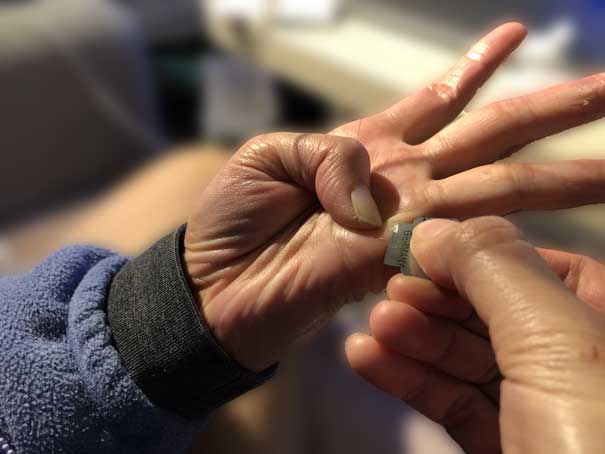
How to tape a flapper (to keep climbing)
For beginners, a flapper often means the end of the session. Experienced climbers tend to tape those babies up and continue climbing. Here are the steps to taping your flappers so you can keep climbing next time you get one.
1. Wash your hands first
Flappers are wounds and should be treated as such. So do as you were taught growing up and make sure to clean the affected area before undertaking any more steps. Get rid of that chalk and all that dirtiness that got on your hands from the climbing hold.
2. Trim away loose skin
Flappers have loose skin that you’ll want to get rid of ASAP, especially if you plan to keep climbing. So take out the scissors of your first aid kid, a nail clipper, box cutter, or ideally a pair of shaving blades to properly trim your flapper.
3. Apply antiseptic
Your first-aid kid should have some antiseptic wipes that will come in handy for this part of the job. Ask the reception of your climbing hall for some wound spray if you don’t have any on hand. If the flapper happens outside and you don’t have a first aid kid on you, skip this step but know I’m judging you.
4. Apply a bandaid
You don’t want to apply climbing tape directly to your flapper, as that will really hurt once you take it off. Bandaids have that cushion that will prevent some pain in the future, that’s why you should use them as a base layer.
PRO TIP: if you don’t have access to a bandaid, folding over a piece of tape to provide cushion is better than placing the adhesive side of climbing tape directly on your flapper.
5. apply climbing tape
Finally, apply climbing tape to your finger. You should have some on hand as they are a climbing essential, but if you don’t you can ask the reception at your climbing hall. They might give you some for free, and they definitely sell them as well so you might as well get a roll for those future flappers.
Aftercare: How to Care for Flappers
Flappers can take a while to heal if you don’t treat them correctly. I remember my first flapper taking a really long time to heal (2 weeks+) because I had no idea what I was doing. Nowadays my flappers are healed within 3 days of occurrence.
Here are some tips for taking care of climbing flappers.
1. Trim away loose skin
Flappers won’t heal properly if you still have loose skin around it. So grab some shaver blades and ensure you get rid of all the loose skin so that your wound is nice and flat to start the healing process.
2. Apply Climbing Balm before bed
Climbers should always apply climbing balm before going to bed after a climbing session, but this is especially important when you have a flapper. Climbing balm will accelerate the healing process of your wounds and these miracle salves are the #1 reason my skin heals so quickly nowadays.
Apply a thick layer of balm directly on the flapper just before heading to bed. Repeat the next couple of days until the flapper is completely healed.
3. Wear tape while climbing
Always tape your flappers when you are still going through the healing process. Not only will it be painful to climb with a flapper, but you might also end up making it worse.
How to Prevent Climbing Flappers
Flappers often just happen, but they are definitely avoidable to an extent. Here are some keen ways you can avoid flappers in the future.
1. keep your hands chalked
All my friends who continuously get flappers are those that tend to chalk way too little. Slippery hands result in more rubbing on the holds which is exactly what causes flappers in the first place. So the #1 way to avoid flappers, is to keep your hands chalked.
Don’t be a cheapskate, and definitely don’t be that guy or gal who thinks they are above chalk. Flappers will come back to bite you in the ass.
2. Tape vulnerable areas
Sometimes, we can sense a flapper coming. Especially during those longer climbing sessions. If you get that sense, tape up that area to prevent the flap.
3. regularly file your calluses
Calluses are great because they prevent flappers, as well as make climbing less painful, but they also aren’t all that because they can tear and turn into flappers as well. Luckily, us climbers have long figured out that filling your calluses prevents them from becoming too thick to the point that they might tear.
I tend to inspect my hands daily and file my calluses whenever necessary. You can use sandpaper for this, or get a climbing-specific one. Personally, I like the crux taco because the sandpaper is cheap, and it’s easy to carry around.
Don’t overdo it though. I’ve seen climbers file their calluses so far down there is nothing left, at which point the chance of getting a flapper increases!
4. Balm your hands every night
Climbing balm is made from beeswax, shea butter, and essential oils which accelerate the healing process in your hands. Applying this stuff before going to bed after a climbing session will help your hands stay healthy and prevent flappers as well as other wounds from occurring.
5. Avoid hot water as much as possible
Hot water isn’t great for the skin, I don’t think you needed this article to tell you this. Especially the hands are vulnerable to hot water exposure. I’m not going to tell you to cut on your hot showers (I definitely don’t) but you should keep this in mind.
Climbing Skin Care FAQs
Here are some frequently asked questions about climbing skin care:
How long does it take for a flapper to heal?
The healing process largely depends on how bad the flapper is. But with proper treatment, it shouldn’t last longer than a couple of days or up to a week.
Can I climb with a flapper?
Yes, you can definitely climb while you have a flapper. Just ensure that you have trimmed the loose skin away so that it doesn’t get worse. Otherwise, just tape up and you’re good to go.
how often should I file my calluses?
Your calluses should be filed regularly to prevent them from getting too thick which is how flappers tend to occur. It helps to always inspect the skin before climbing, and shave your calluses if they aren’t even.
Can I use regular lotion instead of climbing balm?
Regular hand lotions are not recommended for climbers as these make the skin soft which can result in flappers. Climbing balm is better because it accelerates the healing process without softening your skin and making it more susceptible to flappers.